Hardware Clean Up

So, I never realized that the free piece we got off craigslist several months ago could take me as long as it did to get cleaned up/painted.  First, I tackled the hardware.  It was brass hardware that had basically turned almost black over time.

The piece before I started taking it apart...
Before:

Just like I did with the red desk, I used a mixture of vinegar and table salt to clean the brass up.  I don't know how much of each I used, but I basically filled a 9x13 glass pan with enough vinegar to cover the hardware and then I put a decent amount of salt in....maybe 1/8 cup?   I let it soak for a while, but it still wasn't looking as bright and shiny as I wanted it to.  I decided, since this piece was free and not 'precious' to me, I would use an SOS pad to help me get some of the grime/tarnish off of the hardware.

After - sorry for the bad night time shot...it really is amazing how normal household products can have such amazing results!

Basement Curtains

I feel like basement curtains aren't really a wise investment right now, but I am trying every which way to justify them.  The concrete walls just need to be softened up...and I think I would spend more time down there if I liked how it looked a bit more.

I have been obsessed with trying to locate a fabric that brings in lots of different colors so that I could hopefully reuse these curtains elsewhere once we move. For the basement, I would love a fabric with a colored background to bring as much color as possible, but looking forward, that may not be the most re-usable option.

Here are some of my current favorites...


Living Room - back in progress?

I had posted a while ago about the new rug I bought for the living room.  I do like the rug, but I'm thinking a couple of things...
1.  Why didn't I just pick all neutral colors for my house?  :)  I love pops of color, but I am feeling like this might be a bit too much.  I recently visited a new friend's house, and it was done in all neutrals and was so calming and lovely.  It made me want to come home and start from scratch!
 2.  I think my coffee table and end tables are a bit too heavy for the style of the rug.    I keep searching craigslist, but no great finds...yet!  I might lose my mind from running the same searches over and over and over again!!

Before:

Testing out the rug...

With all the furniture back in place...


Destination: Blooming Hill Farm

We have joined a CSA for the summer through Blooming Hill Farm.  I had never been out to the farm itself, but heard that it is very fun.  We decided to check it out one recent Saturday morning.  It was dreamy.  I didn't have very high expectations....but wow, this place is just precious.  I want to live in a place like this.  I found serious inspiration everywhere that I looked while we were there.  Our quick stop turned into a nice long visit with playtime in the stream and a yummy brunch.

Check out the attention to detail....
beautiful herbs...
loved the drink presentation!
quaint inside seating area...notice the flower box separating the shopping area from the eating area...cute!
YUM.
love.
notice the mountain rising in the background beyond the tables...
love the rustic charm that abounds...
I want that sign!

Stormville Flea

Stormville Flea is definitely worth the trip.  (CAUTION:  You may need a lot of patience - it took Paddy and I about an hour and ten minutes to drive the last two miles into the flea market - just stopped traffic all trying to get to the same place).   There were two sections of the flea market - the 'old' stuff and the 'new' stuff.  I was glad that they split the vendors up that way as I was really only interested in motoring through the old stuff.  If you are looking to eat, Paddy and I loved the grilled pretzels they have!

I went last month and came home with some fun finds.  I found a chair/ottoman, a fun 70's hanging light, some tulip bowls and a milk glass vase.

It is going on this weekend - I am contemplating trying to jet out there again - however, I would want to go super early to see if I could beat the traffic we got caught in last time!

My finds from May:
retro hanging lamp...
chair & ottoman from the 40s or 50s, for the nursery...

Change of a Dresser

Our master bedroom has been so ignored.  A few months ago, I finally painted my shabby chic dresser that I bought after graduating college.  What color?  Yellow.  Seems to be a completely unintentional theme in this house.  I just used some left over wall paint from the downstairs half bath.

Before:

Keeping it real...the piled up dog beds that Glory never slept on...and the rug that didn't match the Gray Owl walls...

After:

Dog beds are gone...split leaf philodendron has been added...

Destination: Glenmere Mansion

During my parents recent visit, we took my mom to the most fabulous place, Glenmere Mansion, to celebrate her 60th birthday. 


Sean had read about this place, I did some online research, and we had some friends that highly recommended it.  I knew it was an old historic mansion that has been revived and turned into a boutique hotel.  I thought it would be a place that my mom would enjoy.  Let me tell you, it is eye candy overload.  No pictures do this place justice (and I didn't have my own camera, so I had to borrow my mom's)

One of the owners, Alan, was nice enough to take some time to give us a tour, and it was fun to get some additional background information on some of the pieces, the history of the place, etc.  The designer is Scott Snyder.  I absolutely love his style.

Library...the designer found this chandelier at an estate sale.  He wanted it because it was all black, well, after cleaning it, there was all this crystal and brass...it came from a tobacco estate, so it was just covered in tobacco residue!  Isn't it a beauty?
Isn't this so quaint...what an inviting room that someone can just go in the corner and work on a puzzle!

The GORGEOUS living room.  
There was so much natural light and the mixture of old and new furnishings was perfection.


oh my, I'll take two...

the orchids, the doors, the windows, oh my.

The supper room - with custom painted silk screens with scenes from the Hudson Valley...

Outdoor Area - boxwood heaven.  Off to the left (not pictured), they have a 'reading area' - how wonderfully decadent.
the birthday girl!

Okay, and I think my favorite may have been the bathroom.  I couldn't resist snapping a bunch of pics with my iPhone. It looked like there were little diamonds covering the walls...so glam.  Love.


We ate in their Frog's End tavern - my veggie sandwich was excellent!

And check out the meringue on Sean's cake...so over the top...gorgeous!

They even have a China room, where you can host private parties, and they have over 35 sets of China that the owners have collected over the years, and you can pick and mix and match what China you would like the meal served on.  So fun!

We were there a little to early to get the full effect of all the amazing outdoor spaces that they have...check out this image of the courtyard during good weather...

I can't wait to go back....ahhhh.  I could share so much more...their attention to detail is superb.   Their spa is supposed to open later this year...hmmm...worth saving for?  Probably!  If you can spend $500 - $3500 per night for a room, you should go stay here! 

Light Change


My dad helped hang a chandelier that I bought last summer in Highland Falls (of all places!) while he was here.  At first, when he got it connected, the new-to-me chandelier was not working.  He ended up taking it down, checking out all the wiring...which all looked great.  He then tried again...to no avail.  But...low and behold!  Somehow we had blown a fuse...so after flipping the circuit breaker a couple of times, we were in business.  The chandelier should be a little larger for the space...but I can't tell you how happy it makes me, regardless.

Next time, I hope to not have such a fear of this and tackle it myself!  Thanks, Dad :)

Before:

After - again, wish I was a good photographer...


Accessorize...

If my accessories looked prettier in their drawers, would I use them more?  Nothing else I have tried makes me accessorize...could this work?

Before:
Drawer 1

Drawer 2

In an effort to become more organized and not spend money, I combed through drawers and found my random tea cup collection that hasn't gotten as much use as I would like.  I got this done just in the nick of time before Chantal arrived.  Phew. 

After:


Stitch Witch

So, in Mexico, Ryan and Jamie's place didn't have much storage in the bathroom.  There was a large, wide open space underneath the sinks.  Ryan built some custom shelves to give them space they needed to store toiletries.  They had hoped to conceal the contents of the shelves, so I hoped to help while we were there.  I bought some fabric...hoping it would go with their new duvet from West Elm.  They didn't have a sewing machine, but they did already have the rod to hang the fabric from, so I purchased....

--fabric
--drapery rings with clips
--stitch witchery - heavy duty

I had thought I would make a panel or two, just create a hem around the four edges, and then hang it from the clips.  Unfortunately, the clips hung down too low, so you could see the contents of the top shelf.  Just didn't really serve the purpose we were hoping for.

After I botched the first attempt with 'Stitch Witch' (I will spare you the embarrassing details), I finally figured out how much I love that stuff.  I am sure it wouldn't be great for many jobs, but for this, it was perfect. 

In the end, I ditched the curtain rod clips, cut two panels, made a large hem on the top of the panels (to allow enough room to slide the rod through the top hem), and hemmed the other three sides.

Before:

After:

Chair Challenge - Update

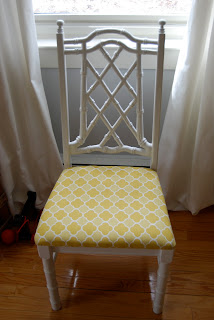
So, I finally finished one part of the chair challenge!  Krissy was a huge help.  We have been trying to have 'project night' to work on some/many of our random projects.  I had hoped to finish the bamboo chairs before the Plebe Parent weekend open house, so Krissy helped me staple/pull/staple/fold corners/and staple some more.  Sean helped me screw the seats back on the morning of the party...and they were done!

Before:


After:

Perfect husband quote after these were done...."What did you change again?  Don't these look the same as they used to?"  No, no and no.  There is no longer sticky vinyl on them, and they have been glued/repaired/sanded/primed/painted/clear coated...NO.  They don't look the same :)

I finished all of the following tasks...

a.  Determine which chairs need something on them fixed (some of the backs are loose, some of the seat braces are coming unglued, etc.)
     b.  Determine if I can fix, or if I need someone to help me.  Likely will need help. (UPDATE:  I was able to find this very honest and helpful handyman on CL, and he fixed all six chairs for me - he checked every joint/loose spot, fixed them all, sanded, primed, painted, and put two clear coats on them!)

     c.  Learn more about reupholstering chairs.
          i.  Price/buy new foam for seats (UPDATE: Still undecided on this...my foam is 1 inch thick, and I would upgrade to 1.5 inch foam - not sure that the 1/2 inch is really worth the cost and effort)
          ii.  Research/decide on stain protection, if any. (Thankfully, I already have the fabric)
     d.  Wash/iron fabric
     e.  Stain protect fabric
     d.  Recover seats

Now onto the next chairs....

Couches

A while back, we scored some chesterfield sofas from CL.  We wanted more seating, and weren't ready to take the plunge to invest (Sean laughs at me when I say that couches are an investment) in 'new' couches, so I found some that would be new to us, didn't cost us much at all, and would achieve the objective of more seating.

The couches, because they are 'vintage' are lower to the ground - not the best for tall people, and are in need of some new foam - but they work for now!

I adore the style of them, but now feel like I need a lighter coffee table/end tables.  I still love our tables that Randy made and if I did find something, they would go perfectly in our basement.  I figure it doesn't hurt to keep an eye out for a good CL find.

Before:

After:

Hi pretty girl :)

Since these pictures, I have added a couple of Etsy pillows, Sean's blanket from USMA, and our wool blanket from Ireland. 

Small bathroom - gallery wall

I recently created a small gallery wall in our half bathroom.  I had originally thought I would do a wall of mirrors but I didn't like the look of the few smaller mirrors that I tried to group on the wall and the quattrefoil mirror didn't quite fit either.  The mirrors seemed to compete too much with the one above the sink.

So, I got some small frames from Michael's while they were on sale.  When I usually do a gallery wall, I am the farthest thing from precise.  I just eyeball it.  Given that this was going to be a tighter grouping than I was used to, I wanted to use a more systematic way.

First, I took a large piece of kraft paper that was about the size of the wall space that I wanted to use for the frames.  Then, I arranged the frames.

Once I had an arrangement I was happy with, I traced the outline of the frames onto the paper as well as I put a small mark where the nail would have to go.


Then, I hung the paper up in the bathroom with masking tape.  I took the nails I wanted to use and I started each nail hole so that there were small holes for me to follow on the wall once I took the paper down.

After taking the paper down, I finished hammering in all the nails, and then hung the frames.  They don't sit against the wall very well b/c of the stands on the back of the frames, so I may need to remove those?  Does anyone have any suggestions for what to do about that? 

I have yet to fill the top left frame - one more reason why I try to avoid frames - I am so horrible about filling them/keeping them up to date!

Chair Challenge

So, there are lots of projects I would like to undertake around the house...but isn't that how it always is?

I talked to Sean about prioritizing projects (this was back in November - yikes.) and he was very quick to say that CHAIRS needed to be number one on our list.  In fact, he gave me an ultimatum of February 1st (yes, 2011) to have them all done by - I knew that wasn't feasible...so I said March 1st.  HA. 

Sadly, I still haven't made much progress.  Only the Bamboo Chairs have seen a little action.  I really do want to start checking some projects off the list, and all the chairs below should be at the top.  Now...if I can just focus and stop thinking about the new desk and free buffet

Here is what I need to do:

1.  Bamboo Chairs (6)
     a.  Determine which chairs need something on them fixed (some of the backs are loose, some of the seat braces are coming unglued, etc.)
     b.  Determine if I can fix, or if I need someone to help me.  Likely will need help. (UPDATE:  I was able to find this very honest and helpful handyman on CL, and he fixed all six chairs for me - he checked every joint/loose spot, fixed them all, sanded, primed, painted, and put two clear coats on them!)

     c.  Learn more about reupholstering chairs.
          i.  Price/buy new foam for seats (UPDATE: Still undecided on this...my foam is 1 inch thick, and I would upgrade to 1.5 inch foam - not sure that the 1/2 inch is really worth the cost and effort)
          ii.  Research/decide on stain protection, if any. (Thankfully, I already have the fabric)
     d.  Wash/iron fabric
     e.  Stain protect fabric
     d.  Recover seats

2.  Black and White Salvation Army Chairs (2)
I have had these since fall of 2008, and I still haven't changed them.  And, a leg broke off of one of them while in Boston...that isn't even fixed yet!  Yikes.
     a.  Call more furniture repair/upholstery places and decide where I will take the chair....or if it is worth fixing it.
     b.  Decide if I will paint chairs (would prefer this to save money), or if I will have them painted so that all the work can be done seamlessly at once.
     c.  Decide if I want to replace the foam in the cushions and have a better back pillow made that will mirror the shape of the chair better.
     d.  Pick fabric.
     e.  Execute!


3.  French Chairs from Scott's (2)
I re-did these chairs while in Georgia, but one of the pair was broken during this move.  In order to fix the chair properly, the chair needs to be taken apart before putting back together so that the joint can be cleaned/re-set.  Unfortunately, or fortunately, that means that the chairs will need to be re-upholstered.
     a.  Call more furniture repair/upholstery places and decide where I will take the chairs.
     b.  Decide how I want the wood painted (probably glossy white...but I seem to want ALL the chairs to be this way...I need to diversify)
     c.  Select a fabric.
     d.  Execute!

4.  Caned & tufted barrel chair (1)
     a.  Decide if I want to leave the current stain or paint.
     b.  Decide if I want to have reupholstered or leave alone for a while.
     c.  Have the chair evaluated as I think it might need a little gluing at some of the joints and a tightening of the seat.  Then have work done!
     d.  Pick a fabric
     e.  Execute!

Mirror, decided.

This poor mirror has been through so much...since the last post about the mirror, I have tried navy and finally landed on gold leafing it.

I sprayed some other mirrors gold this weekend, and I was disappointed with how they turned out, so I was nervous about gold leafing.  However, the finish/color/texture is so much different and better than the spray paint.

To gold leaf this, I first sanded the mirror.  Then, I applied a metal leafing adhesive.  I let it 'dry' for 45 minutes, and then it will be tacky...ready for the super delicate gold leaf sheets.  I applied the gold leaf...I would love to see an expert do this because I am clearly not one.  I had SO many spots to retouch.  Wine and some streaming Netflix movies helped :)  There were some spots that I had missed with the adhesive.  I went back over the missed spots with adhesive, let is 'dry' or get tacky, and then I applied more gold leaf.  Once I had finished the retouching, I applied two coats of sealer.  You can buy all these supplies at Michael's for less than $15.

I am enjoying the results...it is fun to have a finish that is different from my standard painting option. I think it brings a nice pop of color and a bit of glam, which I felt like the room needed.  


 So, here are the stages of the mirror again...

When it arrived in the mail...

Painted white and in the downstairs teeny bath where it just didn't look right...

Then, the mirror stayed white for a few more days and had a test drive in the living room.  I really liked the location, but the white mirror faded into the gray owl walls.

I had a small sample paint of Rich Navy by Glidden.  I did a horrible job, but slapped one thin coat of paint on the mirror to see if I might like navy.  I think this could be nice looking - but I already have too much going on in the room, as it is, so I opted to gold leaf.
And...here is the final verdict.  (At least until I get tired of it :))

this pictures makes it look brighter than it is in person...


Haircut

So, the fiddle leaf fig tree finally got a hair cut.  My new fiddle leaf fig expert friend, Al, helped me with all my questions about the tree.  We moved it to the far corner of our dining room - not the ideal spot for it...but he is honestly SO big, we don't have a perfect spot for him in this room.  But...this will do :)  I gave him a trim, and are going to hope for the best.

Before - this actually doesn't even do justice to just how big and unruly he was!

The tree also got a new pretty basket - this one is the Basay basket from Crate and Barrel - half the price of the PB look alike.  

And some sheet moss too...this came in a bag instead of getting it fresh b/c I haven't found anywhere that carries the fresh stuff.

All the cuttings are providing my 'fresh' greenery fix.  It may not be fresh flowers, but this will do - and maybe they will root if I am lucky!

I hope the tree likes its new home :)

The indecisive mirror.

We received this stunning mirror from my aunt for Christmas....

The mirror was bigger than I had thought it was, and I wanted to find the perfect spot for it in the house.  First, I thought I was not going to use this in our downstairs bath, so I went ahead and painted three other inexpensive mirrors to arrange on that wall.  But then, I decided that maybe it would be good in the bathroom.  So, I painted the black mirror white, and my patient husband hung it for me. After all that, I wasn't convinced it was in the right spot.

In the meantime, I finally moved the fiddle leaf fig tree from the middle of the room where it served as our Christmas tree, and I realized that the mirror might be a perfect fit for that wall.  HOWEVER, the now white mirror doesn't stand out enough against our gray owl walls. 

SOOOO...I am contemplating gold leafing the mirror.  Have you ever gold leafed?  I silver leafed once when I made this for my brother, and I made quite a mess.  I guess I am in the mood for gold - I am brainstorming another gold project.

I will update you as the craziness continues.

The mirror in the guest bath.  Two mirrors that I adore, but they compete against each other.


In the living room.  I like the location...now I have to figure out the right color for the mirror so that it pops.

Who is truly the indecisive one?  The mirror, or me? :)

This just makes me realize that I sometimes just need to slow down and think through more options before trying to rush to a conclusion.

Fruit Crates

I had been on a fruit crate kick lately.  I had seen some pictures of fruit crates on casters and I thought it would be fun to find a few crates, nail them together and put them on casters to serve as a bookshelf for Paddy.

Oh happy day...while we were at home over Christmas, I made my regular trip to Wise Penny in Wheaton (the awesome thrift store that my mom volunteers at), and I found three crates, already nailed together, ready to go.  The store had been using it as a display case, but they said they would sell it for $8.  DONE.  It wasn't PERFECT, but for the price, it was.  The top one is smaller than the bottom two crates, and the inside of the middle crate was painted white...I wish it was still the natural wood.

My dad and I picked up some casters at Home Depot, and he very kindly put them on for me.  Sean was able to fit this into the car to get it home - hooray!

The shelf:


Casters...


The best part of this project is that Paddy is going for his books so much more often than he did when I had them in big baskets on the floor.

Hmmm...which book should I pick? (this is currently one of my favorite gestures of Paddy's)
this one will be good...