ABCs

While I so wish that I could have been back in good old Glen Ellyn with my mom a couple weeks ago to celebrate her 60th, we were fortunate enough to be able to celebrate early with her when my parents visited over Easter.

Thanks to Sommer, who made a book for my birthday last year using this concept, I copied her idea and, along with the help of my brother, we created the 'ABC's of my mom and put them on the clipboards as a fun greeting for her when she arrived.


Since Sean's birthday was in early May, our clipboards are now sporting his 'ABCs' :)

Light Change


My dad helped hang a chandelier that I bought last summer in Highland Falls (of all places!) while he was here.  At first, when he got it connected, the new-to-me chandelier was not working.  He ended up taking it down, checking out all the wiring...which all looked great.  He then tried again...to no avail.  But...low and behold!  Somehow we had blown a fuse...so after flipping the circuit breaker a couple of times, we were in business.  The chandelier should be a little larger for the space...but I can't tell you how happy it makes me, regardless.

Next time, I hope to not have such a fear of this and tackle it myself!  Thanks, Dad :)

Before:

After - again, wish I was a good photographer...


Butter

I had never given a thought to making my own butter until I read Liz Stanley's post about it...

If you have some heavy cream and a stand mixer, you can be on your way.  I still haven't perfected it, but have now made a few batches of regular salted butter as well as some honey butter.

If you are looking for a fun project, you should give it a try.

Being that I am as impatient as I am, I skipped the shaking of the cream in the Ball jar.  I poured a large container of heavy cream into my mixer along with some salt (I am still trying to figure out the right amount of salt), started whipping it on high and just let it run.

Just whip it until it separates...you will have some chunks and some liquid.  The liquid is actually buttermilk.

Now, it gets a little messy...just reach in and start bringing all the solid bits of butter together, into a ball.  Squeeze out as much buttermilk as you can.  If buttermilk is left, the butter won't last as long.  Some sites recommend washing the butter under cold water until the water runs clear to ensure that the buttermilk is gone.

And, voila.  You have fresh butter.  Pop it in the fridge to let it firm up...and done!

Laundry Update

I made another large batch of detergent, this time I wanted to figure out the costs and how long it lasts me.  I mixed up '10' batches, and it took me no longer than 15 minutes as I used my food processor to grate the soap.
Finally, the jar looks more full :)

Soap - used 5 bars out of a package of 8
Borax - Used one box (approx. 10 cups in the box)
Washing Soda - Used 1.75 boxes (approx. 6 cups per box)

Soap Cost - $2.50
Borax - $2.39
Washing Soda - $3.59
Total - $8.48

I will update once I figure out how long, from April 7th, this will last!

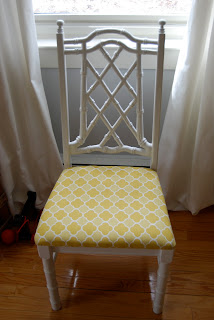
Chair Update - Caned Chair

So, I guess I can sort of cross another chair off the list.  I decided that I would do the caned chair on my own to hopefully be a low cost project.  Maybe one day I will have it reupholstered, but the yellow will do for now....

Here is what I did to it...

1.  Took the seat off the chair which was much more difficult than expected...thanks to Krissy, Jean and Sean, it finally came off.
2.  Green Machined all the upholstery on the chair (should have done this AFTER the sanding, as I will now need to do it again!)
3.  Sanded all the wood
4.  Wiped the chair down
5.  Covered the upholstery on the back of the chair that I couldn't pop off using plastic, paper and masking tape
6.  Spray painted the chair glossy white (three coats)
7.  Reinforced the bottom of the chair with zip ties (those things fix EVERYTHING).

Here is the before of the $10 find:

Before:

After:


I still have yet to have Sean screw the seat back on as I feel like a few spots need some more paint.  I absolutely loved how the chair looked when I was spraying it outside, and now that I have it put back together, I am not quite as sold.

But, for the cost of a couple cans of spray paint and a few hours of work, I think it was worth it!  A less than $20 investment...

Transformation of a craigslist find...

Sommer was kind enough to share her amazing chair transformation with me.  She got these chairs for $12.50 each!  What a deal!!  She then sanded and painted them, and started to reupholster them herself, then decided to hire some of that work out (I would have too!).  The results are stunning!  She helped breathe so much fresh life into these chairs.  They have an upcoming move to sunny FL, and this fun geometric print will be perfect.  Thanks so much for sharing this inspiration, Sommer!

Before:

After:

Stitch Witch

So, in Mexico, Ryan and Jamie's place didn't have much storage in the bathroom.  There was a large, wide open space underneath the sinks.  Ryan built some custom shelves to give them space they needed to store toiletries.  They had hoped to conceal the contents of the shelves, so I hoped to help while we were there.  I bought some fabric...hoping it would go with their new duvet from West Elm.  They didn't have a sewing machine, but they did already have the rod to hang the fabric from, so I purchased....

--fabric
--drapery rings with clips
--stitch witchery - heavy duty

I had thought I would make a panel or two, just create a hem around the four edges, and then hang it from the clips.  Unfortunately, the clips hung down too low, so you could see the contents of the top shelf.  Just didn't really serve the purpose we were hoping for.

After I botched the first attempt with 'Stitch Witch' (I will spare you the embarrassing details), I finally figured out how much I love that stuff.  I am sure it wouldn't be great for many jobs, but for this, it was perfect. 

In the end, I ditched the curtain rod clips, cut two panels, made a large hem on the top of the panels (to allow enough room to slide the rod through the top hem), and hemmed the other three sides.

Before:

After:

Chair Challenge - Update

So, I finally finished one part of the chair challenge!  Krissy was a huge help.  We have been trying to have 'project night' to work on some/many of our random projects.  I had hoped to finish the bamboo chairs before the Plebe Parent weekend open house, so Krissy helped me staple/pull/staple/fold corners/and staple some more.  Sean helped me screw the seats back on the morning of the party...and they were done!

Before:


After:

Perfect husband quote after these were done...."What did you change again?  Don't these look the same as they used to?"  No, no and no.  There is no longer sticky vinyl on them, and they have been glued/repaired/sanded/primed/painted/clear coated...NO.  They don't look the same :)

I finished all of the following tasks...

a.  Determine which chairs need something on them fixed (some of the backs are loose, some of the seat braces are coming unglued, etc.)
     b.  Determine if I can fix, or if I need someone to help me.  Likely will need help. (UPDATE:  I was able to find this very honest and helpful handyman on CL, and he fixed all six chairs for me - he checked every joint/loose spot, fixed them all, sanded, primed, painted, and put two clear coats on them!)

     c.  Learn more about reupholstering chairs.
          i.  Price/buy new foam for seats (UPDATE: Still undecided on this...my foam is 1 inch thick, and I would upgrade to 1.5 inch foam - not sure that the 1/2 inch is really worth the cost and effort)
          ii.  Research/decide on stain protection, if any. (Thankfully, I already have the fabric)
     d.  Wash/iron fabric
     e.  Stain protect fabric
     d.  Recover seats

Now onto the next chairs....

Mine aren't nearly as cute as Jenny's...

So, I attempted Jenny's roman shades made from mini blinds with some of the $1 panels I recently acquired and some miniblinds from WalMart ($7.50 each).  I bought 4 matching gray panels, but we have three windows in the master bedroom, so I figured this would be a good way to use the panels and still cover all the windows.  Needless to say, mine aren't nearly as adorable as hers were :)

plain jane shade from Walmart!

snipping all the blind supports...

these are the only slats left on that whole blind!

The Fabritac that still looks wet, even though it is dry! UGH.

my unfinished top...

my unfinished bottom...

First of all, this was my first time using Fabric glue...so, I guess I used too much maybe because the glue came through the fabric.  I thought when it dried, you might not be able to notice, but it still has that 'wet glue' look.  BOO.

In typical Meghan DIY fashion, I want to be a perfectionist, but I can't really figure out every last little step to make it look polished and perfect, like Jenny's.  Because of my lack of patience,  I need to still finish off the tops as well as the bottoms.  I may resort to using safety pins to finish up the bottoms....yikes.  I was a bit unclear on that part of the directions...

I contemplated buying trim, but then I would probably quickly defeat this inexpensive DIY (3 windows for under $30). 

So, these will probably just need to be less than perfect roman shades!  I will post a better picture once I get them up in the room...

Lampshade light fixture - DIY

After we broke one of the lamps in our bedroom, I wanted to figure out a way to use the lampshade as a light fixture for the small spot between our 'cruise ship' bathroom and our teeny closet. Our place is definitely not up to code from an electrical standpoint, so we have needed to rig up lots of lights around our place.  

We had our fair share of those Ikea Hemma cords, so I had rigged up an off-center attempt...do you see how the lightbulb is not in the middle of the shade? This drove me crazy!


I wrapped the cord around the lampshade supports, but couldn't successfully keep the lightbulb in the middle of the lampshade...argh!


Now I am seeing these fixtures popping up in lots of catalogs!  Fun. So, thanks to my brother's awesome tutorial, he helped me take my off-centered attempt at a cool new fixture to the real deal.  Our disclaimer...neither of us are electricians, so do this at your own risk ;).

I talked to Ryan because I thought if I could figure out how to splice the wire to allow it to feed through the small opening on a lampshade, I could start keeping an eye out for cool lampshades to serve as light fixtures around our next house. Ryan had a Hemma cord laying around as well, so he put together the following tutorial.

What you need:
--Ikea Hemma Cord
--Lampshade
--light bulb
--Knife (I used a Gerber)
--Wire Cutters (not necessary, but made things a bit easier)
--Electrical tape

Step 1 - Cut cord. I decided to do it near the plug cause it is probably less visible there.

Step 2 - Slice the main sheath back to expose the white and black wires.


Step 3 - Now strip the insulation off the actual wires. You likely cut a few pieces of the wire as well (as you can see that I did), but as long as you don’t cut a bunch of them, it will be fine.


Step 4 - Twist the wires.

Step 5 - Twist the two whites together and twist the two blacks together.

Step 6 - Tape each wire separately so the copper can't touch.

Step 7 - Clip a little bit of the outer sheathing off as the cord will now be a little shorter.
Step 8 - Tape back together tightly.  You could probably get some of those shrink wrap tubes in white and use those instead of tape if you want it to be a bit cleaner.

Here is my pic...I don't have white electrical tape...
And here is my brother's pic - you can tell he is much better at this than I am :)

So, it doesn't look all that much different, but to me, it does.  I am SO happy that the bulb is now properly set inside the shade!  Thanks so much to Ryan for the perfect tutorial.  I hope to be able to use this idea again!

Going BOLD feels good.

So, the desk...the red desk.  Red Delicious to be exact.  It's finally done.  Here are the steps I took to breath some new life into this old beauty.  For upcoming projects, I am going to try to make more of an effort to document the whole process with pics...

As a reminder, here is the 'before' picture:

1.  Removed the hardware and cleaned it using salt and vinegar - a suggestion that I learned about from Jenny's blog, Little Green Notebook.  Here is a before shot...this brass needed some serious TLC.

Before...

After...

2.  Sanded the desk down by hand.  I just used very fine paper b/c that was all I had.
3.  Used wood glue to fix a few spots on the top of the desk where the veneer was pulling up.
4.  Primed the desk - LESSON LEARNED:  Use tinted primer next time when painting something a bold color.

I made sure to get a pic of it primed so that I could remember what it looks like while it is white for the inevitable day when I decide going bold no longer feels good :).  (hopefully this is many years down the road!)


5.  Then I painted.  A lot.  It took 4.5 coats to make sure the primer was really covered and the red was truly Red Delicious.  Next time, tinted primer.

6.  We moved the desk into our bedroom before the girls' weekend.  Being a person of immediate gratification, I wanted it to look presentable when they got here.  I thought it was dry...or maybe I just made myself *think* that it was dry, so I put some stuff on top of the desk while it was clearly NOT dry.  Whoops.  You would think I would know better...since I don't though, I had to go back and do another coat of paint on the top.

7.  I wasn't sure of the best way to apply the Wipe On Poly.  I was worried that if I sanded the desk before applying, I might lose the glossy look.  But, I ended up sanding it with very fine (220) sandpaper.  I sanded too hard and got down to the white primer...boo.  So I had to repaint a few areas.  I then applied two coats of Wipe On Poly, and I did not sand in between coats.

8.  I made 12 color copies of a pretty Paper Source Japanese paper as I thought it would make good drawer liners.  I always want to have pretty drawer liners as I know they would make me so happy, but I am always too lazy/cheap to do it.  I really love the pop of light blue and pink, red and white flowering branches whenever opening a drawer!  Mental note:  Do this more often.


The finished product...


In an effort to not be as rushed this time, I made sure that nothing was on the desk before I left for Chicago, so it can dry for a full week!

Now, I just need a chair....

Kitchen Island - Ikea hack

* 2/28/10 - Update:
Ryan found the following towel rack that I like SO much better than the one that I bought.  I may have to stop at a Container Store and get one:


In our old house, I wanted a small cart for the kitchen.  I found one at Ikea that I wanted, and it took a LONG time to get it, but once I did, I was so excited to have a little extra storage and counter space for a great price!
 
Thanks for assembling for me, dad!

I sanded down the cart minus the top, and then I stained it a dark brown.  It was the first time I had stained anything (what a pain!), and the Ikea wood didn't want to absorb much of the stain.  Nevertheless, if you look at it from a distance, it isn't too horrible.

Glory sitting with the cart right after I finished it...
 
 Even though our kitchen was teeny in GA, I loved it. 
 

Since I have finished it, I have thought it would be nice to have a towel rack on one of the ends.  I looked and looked and couldn't find what I was wanting.  I was at Target a couple days ago, and I picked up this 'over the door' towel rack, thinking I might be able to make this work on the cart. 


I unscrewed this side piece and just slipped the hook over it.  I think I will buy another hook next time I go to Target so that there can be a hook on either side of the middle screw to balance it out.  Wow, look at how bad of a stain job that is!


It's nice to have a place to hang a towel now!
 

French Chair Re-do

I spent a couple of hours the other night (when I should have been sleeping!) going through old pictures.  I found so many from our old house, so I will probably be reminiscing with some posts about old projects :)

Sommer and I first went to Scott's back in early 2007.  While we were there, I found a pair of old French chairs...

Before...
 

I was hosting Sommer's 30th birthday that year, and I really needed extra seating, so I got to work on them right away.  I sanded them down, then I painted them with a flat antique white paint, and then I rubbed some Ralph Lauren stain over the paint to give it a distressed/antiqued look.  If I had to do it over, I would have painted them gloss white!  Then, I found a nice chocolate brown fabric, and I had them re-upholstered.  I think I sort of rushed the sweet lady that was working on them (my immediate gratification issue) which I now know I shouldn't have done since I think the chair seats could have used some more batting/padding and I can notice some of her staples when I look closely.  But, I was pretty happy with how they turned out.  Since then, the joints have gotten loose on one of the chairs, and I now have to figure out how to deal with that issue because to properly fix it, the upholstery would have to be ripped off :(.   UGH.

After...


Sneak Peek...

I am still trying to figure out the best way to put the Wipe On Poly on the desk, but I am so happy with how the color turned out.  We decided to move the desk down into our bedroom hoping that the desk will get more use than it did up on the third floor landing!

I will post more pics once it is complete!

"It's all up here"

Years ago, I gave my dad a picture of a Pottery Barn bed, and said, "Dad, don't you think you can make this for me?"  In the next few years following that exchange, I would ask, "Hey Dad, how is that bed coming along?"  The response would be (while pointing to his head)..."It's all up here, Meghan.  It's all up here."  One day, the bed was finally ready, and let me tell you, it was gorgeous.  He did a fantastic job.


Once I knew Paddy was coming, I asked my dad if he thought he could whip up a kiddo-sized coat rack and one of those wooden changing table toppers.  Needless to say, he didn't disappoint!   Again, the quality of his work is amazing.  Sean Patrick is lucky to have such a handy grandpa.  I hope my dad will be able to pass some of his knowledge along to our little man.   I feel so blessed to have such a talented Dad...and one who is willing to go along with my ideas!


Another potential project...canvas bag

So, along with the laundry cart misunderstanding, there was another one. Ryan had mentioned maybe I could attempt making him a canvas bag with a 'stained' M on it. I was thinking he meant a big weekend bag. I was immediately constructing it in my head...

Base it on bags like these...


Get some cool canvas/duck cloth in a neutral color, use some thick rope for handles...like this...


Make stencil out of cool font and do some fabric painting...like this tutorial.

The only question I have would be how to sew the rope on as my sewing machine couldn't go through it, so I guess I could sew on either side of it - similar to the bag above, but then how would I connect/tie the rope?

Anyways, what Ryan was REALLY asking was...if he built a wood frame, could I build a canvas bin (like the ones I want for the other potential project) to go around it. Wow, totally misunderstood. BUT...now we have ideas for new fun projects!

Potential Project

So, from an email misunderstanding has come a potential very cool project. Ryan was talking about wanting to build himself a laundry cart sort of like this one, but with a wooden top that could be used for folding, but could also be removed....


I misunderstood and was selfishly thinking he was talking about trying to build one for us out of my left over bowling slab from Paddy's dresser. So, he humored me, and we continued thinking about it...it could also be a cool toy storage piece for Paddy, or really anything - a cool mudroom organizer, laundry bins, etc. You know I adore furniture that can be multi-purposed.

Plus, these bins have been on my Amazon wishlist for a while now, so it would be an awesome excuse for having some!


Based on our email exchanges, Ryan did this great drawing...


We 'discussed' a few options, but we were thinking of adding another row of the canvas bins to maximize storage space. The legs would be wood or maybe iron...I think iron could be fun in keeping with the industrial feel.

So, now, either I need to become a woodworker, or I need Ryan to come back and visit. Oh yeah, and we need more room in our apartment to place a piece like this :)

Hopefully there will be some developments on this plot...

Mobile - a little jacked up, but finally complete!

I have been working on this mobile for Sidekick this week. I wish I was a more patient person. I had issues cutting the balsa wood (SO fragile!) and the staining...oh, the staining. It took forever to dry, so it was a several day process, and I get so impatient that I completely botched the last coat. However, once I got the final product hung today, I was pretty excited about it. I know it is not lots of bright colors, nor does it play music, but hopefully Sidekick will enjoy it.


I had a few 'double acorns' - which worked out so perfectly b/c now whichever way the squirrels spin, you can see the acorns...

This is the mobile that I was inspired by...

The one that I made cost about $4 for the wood, and I had everything else...

Mighty Oaks from Little Acorns Grow

I love acorns.


I think they are one of the cutest, most perfect little tidbits of nature. They seem to be cropping up everywhere! When we went to the Breakers Mansion in Newport a few months ago, I loved how the Vanderbilt family crest was centered on an acorn. I then scoured around and found an eBay lamp to incorporate an acorn into Sidekick's nursery. I found a more modern resin one that I liked better, but I really liked the fact that this was 1950s Italian alabaster or marble (I never know how to tell the difference).

The last couple years, I have had some acorns that I put into my apothecary jars when fall time rolls around (thanks, Sommer, for picking those big ones up for me from the Ft. Benning golf course!). So, I have started seeing some good ones around here. Thus, Glory has been my companion on some acorn searches lately. Pottery Barn is selling a small package of fake ones for $14...so I figure, why not get them myself. Someone once told me that you could super glue them back together if the tops fell off, so in the middle of watching a movie, I glued and glued and glued. Like my mom said, I guess I am a glutton for punishment! Let's hope they stick :)

Okay, enough of my acorn babble. I am trying to gear up to attempt to make a mobile for the nursery. I was going to do birds but in light of my acorn obsession, now I am thinking I will attempt squirrels with acorns? We will see.

Have a great weekend everyone!


Notice the delicate bowl that Hallie gave me - I believe this was an Etsy find...I find it perfect for pretty little things...


the lamp in the nursery...I found a PB shade for $11.97, got a smaller harp for the lamp so that the poor shade fit, and then had it re-wired. Oh yeah, and, b/c our place is so old and totally not up to code electrically, I got a remote controlled dimmer for this bad boy. LOVE IT.